Every retoucher has had this conversation. The image looks right on your calibrated display. It looks right in the proof PDF. Then the buyer opens it on the e-commerce CMS and the navy looks black, the cream looks grey, and the red has shifted somewhere toward orange. Nobody changed the file. The pipeline changed the file.
Color managed retouching is not a single tool or a single setting. It is a chain of decisions that starts at the camera and ends at every channel the asset is published to. If any link in that chain is wrong - the wrong working space, an uncalibrated display, a DAM preview that strips the profile - the rest of the chain cannot recover. This article walks through the practical setup that holds together in a real studio.
The short version
- Capture in a wide working space (Adobe RGB or ProPhoto for raw), not sRGB. You can always convert down; you cannot recover gamut you never captured.
- Calibrate displays every two weeks, with a hardware probe - not by eye, not once a quarter.
- Soft-proof for the destination channel before sign-off, not after.
- Hand off layered files in a documented format with embedded profiles and rights metadata.
- Convert to the channel profile at distribution time, automatically - not in a retoucher's manual export.
Working spaces, in plain language

ICC working spaces define the gamut your edits live in. Three matter for studio work.
sRGB is the smallest of the three and is the default for web and most consumer displays. It is the right delivery space for e-commerce and social. It is the wrong working space for retouching anything that will also go to print or to a wide-gamut display, because once an edit is committed in sRGB you have lost the colors that fall outside it.
Adobe RGB (1998) covers most printable cyans and greens that sRGB clips. It is the practical default working space for fashion and product retouching when print is in scope. Most pro displays cover it natively.
ProPhoto RGB is larger than any current display can show and larger than any printer can reproduce. It exists to preserve raw capture data through aggressive edits without clipping. Use it as your raw-development working space if your retouchers understand that values outside Adobe RGB will be clipped at output - never as a delivery space.
The rule is simple: edit in the largest space your team can manage without mistakes, deliver in the space the channel expects. For most studios that means raw development in ProPhoto, retouching master in Adobe RGB, sRGB at distribution.
Monitor calibration cadence
A retouching display drifts. Backlight ages, room light changes with the seasons, and a display that was within Delta E 1.5 in March is at Delta E 4 by August. Delta E 4 is the difference between "the navy is right" and "the navy is wrong" on the same file.
The cadence that holds in practice:
- Every two weeks - full calibration with a hardware colorimeter or spectrophotometer, target white point D65, target luminance 120 cd/m² for retouching (lower than the showroom-mode default).
- Every quarter - full profile rebuild, not just a re-validation, on every retouching display.
- At any room change - new lighting, repainted walls, new desk position. Ambient light leaks into perception faster than retouchers think.
Validate after calibration. A passing report should show average Delta E under 2 across the standard color patches. If your displays will not hold that, they are no longer retouching displays - move them to admin desks and replace them.
Soft-proofing for print versus web
Soft-proofing is the practice of previewing how an image will look in a specific output profile, on your editing display, before you export. It is the cheapest way to catch a color disaster.
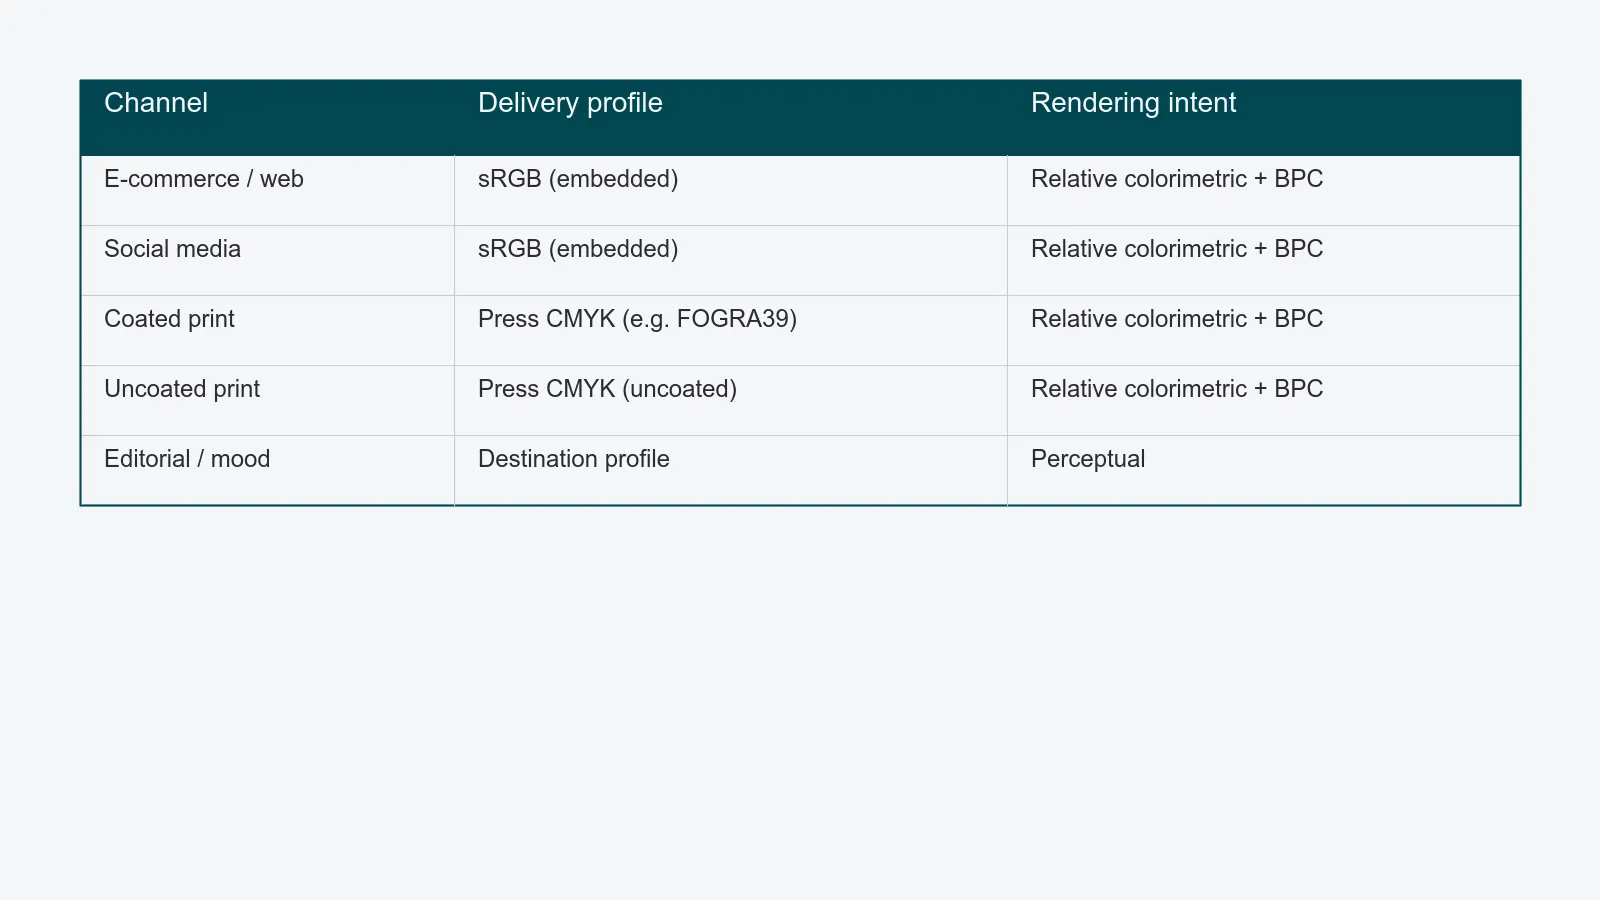
For web channels, soft-proof against the relevant sRGB profile before sign-off on any image that will be uploaded as is. Pay attention to deep blacks (often crushed on phone displays) and saturated reds (which clip earlier in sRGB than in Adobe RGB).
For print channels, soft-proof against the actual press profile your printer supplies - not a generic CMYK like SWOP unless that is genuinely what your printer uses. Watch for out-of-gamut warnings on saturated brand colors. A red coat that prints fine on coated stock can shift visibly on uncoated stock; both should be proofed if both are in scope.
This is the moment to bring rendering intent into the conversation. Relative colorimetric with black point compensation is the right default for product imagery - it preserves brand colors as accurately as the destination allows. Perceptual is for images where overall mood matters more than spot-color accuracy, like editorial scenes.
Ingest standards: camera color space, raw vs JPG
The capture stage is where most pipelines silently lose data. Two settings on the camera matter.
Color space should be Adobe RGB on every body that supports it, even if the buyer ultimately wants sRGB. The camera's setting only affects in-camera JPGs and the metadata tag on raws - but a wrongly tagged file confuses every downstream tool that reads the tag rather than the pixels.
Raw vs JPG. Raw is the only format that preserves the camera's full sensor data and lets retouchers commit to a working space at development time. In-camera JPG bakes the color space, white balance, and tone curve into 8-bit pixels - fine for proofs, never for retouching. The pipeline standard for any image that will be retouched is raw, full stop.
A few smaller ingest rules earn their keep:
- Tether captures with the working profile already assigned, so the first preview on the art-director's monitor is already color-managed.
- One white-balance reference per setup, shot before the first hero frame, used to neutralize the rest of the set.
- Embed shoot metadata at ingest - capture date, photographer, sample SKU, brand. This is where rights metadata begins.
Retoucher hand-off conventions
The retoucher-to-QA hand-off is where most studios lose layered work. The fix is to standardize the hand-off format and the file structure.
Format. PSD or layered TIFF. PSD is the practical default for most teams because it round-trips cleanly through Photoshop and Capture One. TIFF is preferable when files cross between Photoshop and other tools, or when files exceed Photoshop's 2 GB PSD limit (use PSB or TIFF for those). Both must have the working profile embedded, not just assumed.
Layer naming. A small set of conventions, applied consistently:
- Group by purpose:
01_base,02_color,03_retouch,04_dodge_burn,05_output. - One adjustment layer per intent. Five curves layers stacked is unreadable in QA.
- Output flattening is a final, separate step - never destructive in the master.
Rights metadata travels with the file in IPTC and XMP fields, not in a separate spreadsheet. At minimum: usage rights, expiry, model release reference, photographer credit. If your DAM does not read XMP, the rights data is invisible to everyone downstream - see why a real DAM beats a shared drive for why this matters at scale.
Distribution: convert at the edge, automatically
The most common color disaster in studio output is also the most preventable: a retoucher exports an Adobe RGB JPG, the e-commerce platform strips the profile on upload, and every browser renders the file as if it were sRGB. The image looks fine in the studio, washed out on the storefront.
The fix is not to retrain retouchers. The fix is to convert to the channel profile at distribution time, in software, on every file. The retouching master stays in Adobe RGB. The web export is sRGB with the profile embedded. The print export is the press CMYK profile. Each export is generated automatically from the same master, using the same conversion settings, without a human deciding which to choose.
This is exactly what automated channel-aware exports handle alongside the rest of post-production: the master file is processed once, and each downstream channel gets the version it needs, in the profile it expects. The retoucher never thinks about it. The buyer never sees a color shift.
Common pitfalls
A short list of failures we see repeatedly:
- DAM previews that strip profiles. A DAM that resizes assets for thumbnails without honoring the embedded profile makes every preview lie. Verify your DAM's preview pipeline reads and applies ICC.
- Mixed working spaces in a single PSD. A smart object pasted from an sRGB file into an Adobe RGB master is not converted automatically in every tool. Check on import.
- CMS strips on upload. Many e-commerce CMSs convert to sRGB but discard the profile tag. Confirm by downloading an asset back from the live site and inspecting it.
- Calibration drift on remote retouchers. A freelancer's display is not in your studio. Either standardize on a small list of approved displays with a calibration schedule, or treat their output as proofs only.
- Soft-proof at the wrong stage. Soft-proofing after sign-off is theater. Move it before sign-off, on the master, with the actual destination profile.
FAQ
Is sRGB ever a working space? For images that will only ever appear on web, in 8-bit, with no print extension and no second life - yes. For anything else, edit wider and convert at the edge.
ProPhoto or Adobe RGB for retouching masters? Adobe RGB for masters that retouchers handle daily. ProPhoto for raw development inside Capture One or Lightroom, with conversion to Adobe RGB before retouching begins.
How often should we recalibrate displays really? Every two weeks for retouching displays. Once a quarter is too long; high-end studios drift visibly within a month.
What about HDR product imagery? HDR delivery is still rare in product imagery, but if you are exporting for HDR-capable channels, work in a wide space with a 10-bit pipeline and validate against the channel's HDR profile. Treat it as a separate output, not a replacement for sRGB.
Who owns the color pipeline in a studio? A senior retoucher or color lead. Not the IT team and not the producer. Color decisions are craft decisions; the platform should make them enforceable, not make them.
Closing
Color managed retouching is unglamorous infrastructure. Done well, it is invisible - every channel renders the same image the same way, and the buyer never has a reason to ask why the navy looks off. Done badly, it is the source of most reshoot conversations that begin with "the file looked right when we sent it."
The fix is not heroic. It is a wide working space, hardware calibration on a real cadence, soft-proofing before sign-off, embedded profiles in every hand-off, and automated conversion at the channel boundary. Five rules, applied without exceptions.
If you want a second pair of eyes on your pipeline - where the profile mismatches are hiding, which stage is silently flattening files, what a sane automated distribution path would look like - we will walk through it with you and give you a concrete remediation list.